


For homeowners facing the prospect of an old and potentially hazardous oil tank, the DIY approach to removal can be an appealing but challenging endeavor. “Tank Termination” is a comprehensive guide that empowers homeowners with the knowledge and steps needed to safely and responsibly remove an oil tank on their own. This article outlines the essential considerations, steps, and precautions for a successful DIY oil tank removal.
Assessment and Decision-Making: Know When It’s Time
The DIY journey begins with a thorough assessment of the oil tank’s condition. Check for signs of rust, corrosion, or leaks. Evaluate the tank’s age and overall structural integrity. If the tank is nearing the end of its lifespan or showing signs of deterioration, it’s time to consider removal. Making an informed decision based on the tank’s condition is crucial for a successful DIY endeavor.
Research Local Regulations: Navigate the Legal Landscape
Before starting the removal process, homeowners must research and understand local regulations governing oil tank removal. Regulations vary, and compliance is essential to avoid legal repercussions. Obtain the necessary permits and adhere to safety standards outlined in local codes. Navigating the legal landscape ensures a smooth DIY process without regulatory hurdles.
Safety First: Protective Gear and Precautions
Tank termination involves potential hazards, and safety should be the top priority. Invest in the appropriate protective gear, including gloves, eye protection, and a mask to prevent inhalation of fumes. Work in a well-ventilated area, and keep a fire extinguisher on hand. Prioritize safety precautions throughout the DIY removal process.
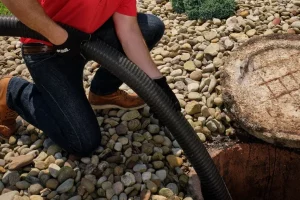
Emptying the Tank: Safe Oil Disposal
Before removal, it’s crucial to empty the tank of any remaining oil. Use a hand pump or hire a professional service to pump out the oil safely. Dispose of the oil following local environmental regulations. Consider recycling options or contact local authorities for guidance on proper disposal methods, preventing environmental contamination.
Cleaning the Tank: Minimize Residue
Once emptied, thoroughly clean the interior of the tank to minimize residue and fumes during removal. Use absorbent materials to soak up any remaining oil or sludge. Proper cleaning ensures a safer and more manageable DIY removal process.
Gathering Tools and Equipment: Be Well-Equipped
DIY oil tank removal requires specific tools and equipment. Gather essentials such as a reciprocating saw, pry bars, wrenches, and a portable cutting torch if needed. A sturdy dolly or hand truck can assist in transporting the tank. Ensure all tools are in good working condition before starting the removal process.
Excavation: Unearth the Tank Safely
Excavation is a crucial step in tank termination. Dig around the tank carefully, exposing it for removal. Exercise caution to avoid damaging the tank or underground utilities. As the tank becomes visible, assess its condition to anticipate any challenges during the removal process.
Lifting and Transport: Use Caution
Lifting and transporting the tank require careful consideration. Use a dolly or hand truck to move the tank safely. Enlist the help of additional hands to ensure a controlled and secure transfer. Take breaks as needed to prevent strain and maintain focus on the task at hand.
Proper Disposal: Environmental Responsibility
Once removed, it’s essential to dispose of the oil tank responsibly. Contact local recycling centers or disposal facilities to inquire about proper disposal methods. Many areas have specific guidelines for scrap metal disposal, and adhering to these regulations ensures environmental responsibility.
Site Remediation: Address Potential Contamination
After removal, assess the excavation site for any signs of soil or groundwater contamination. If contamination is suspected, consult with environmental professionals for guidance on remediation measures. Timely and appropriate remediation safeguards the property and surrounding environment.
Conclusion:
Tank termination through DIY oil tank removal can be a rewarding but challenging undertaking. Homeowners equipped with the right knowledge, safety precautions, and tools can successfully navigate the process while ensuring environmental responsibility. By following this DIY guide, homeowners can confidently tackle oil tank removal, promoting safety, compliance, and a sense of accomplishment in terminating an aging and potentially hazardous element from their property.


Add Comment